

How To Animate Over A Video Adobe Animate
Larn how to brand lower thirds for your videos and animate them in or out using Adobe Premiere Pro or Adobe After Furnishings.
"Lower thirds" is the word editors use to describe the text in a video, often represented in a graphic shape and placed in the bottom xxx% of the screen (equally the name implies). You might recognize a lower tertiary as the name beneath an interview subject on a reality TV testify, the championship of a story on a news circulate, or the social media handle that appears beside a guest on a YouTube video.
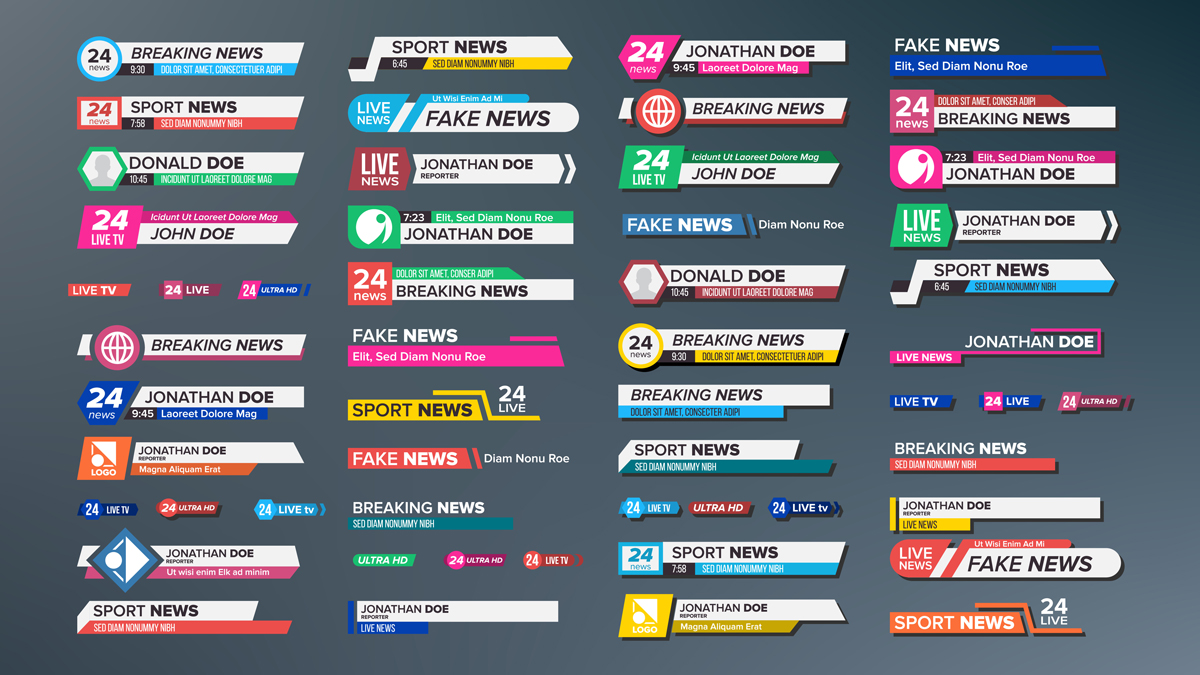 Some examples of lower thirds. Demand inspiration? Become online to Adobe Stock and search "lower thirds" for more ideas like this!
 Yous can make your own lower thirds for video projects in either one of the Adobe video programs: Premiere Pro or Subsequently Furnishings. Whether yous're trying to do a bones text overlay or become a little more than fancy with background graphics, colored shapes, and moving parts, this tutorial will introduce yous to the basics of animated lower thirds.
How to Make Blithe Lower Thirds
- Design your lower 3rd, but don't worry about making it "move" yet.
Take an thought for how you want your lower tertiary to look? Get started by designing information technology with your video on break. Depict shapes using the rectangle and circumvolve tools (or the pen). Add your words with the text tool. (If you're making a template to apply multiple times, it's all-time practise to use the longest name/title/location equally your instance, just to brand sure everything volition fit.) This bubbly style is more simple, suited toward a YouTube video or workplace advertisement.
If you take a more complex vision, yous tin blueprint assets in Adobe Illustrator and bring them in every bit .png files. For inspiration, watch your favorite videos or search for examples online.For this tutorial, I decided to do a simple lower 3rd with my name, title, and a plainly color background. The shape is just two bars, each fitting the length of the text.
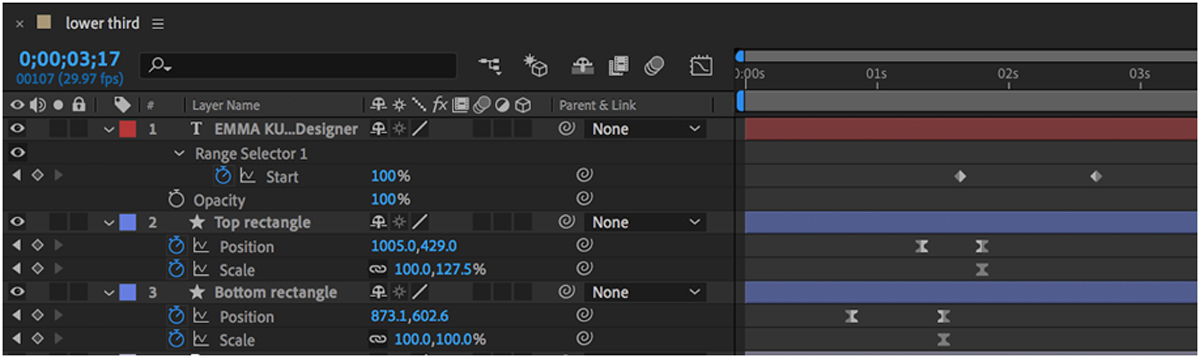
- Lock the elements in their final positions first.
The goal is to kickoff with every element off the screen or invisible in some manner and end with everything ending up in identify. To begin, move the playhead to 2 seconds and highlight all of your layers. On i of them, click the stopwatches next to position, scale, and opacity. This will lock all of the objects in the identify where you want them to end up after the quick, 2-2nd blitheness is complete.
- Breathing the elements onto the screen.
There are endless methods for bringing elements into the screen. Here are some options, merely experience free to create your own using keyframes and effects. As a general dominion, have the shapes animate in the offset second and the text animate in the next second. You tin can suit this for a customized consequence.- To bring boxes in from the side: With the playhead at 0, drag both rectangles off-screen and fix a position keyframe. If you have multiple boxes, stagger their entrances so that it doesn't look similar one stock-still object.
- To have the boxes "unfold" downwardly: In the transform options for both rectangles, unclick the "link" beside "scale." At 2d 1, the calibration should be 100% and the position should be where y'all want them to be. At second 0, set up both of their scale y-values to 0. Gear up their positions so that the thin lines outset at the "top" of where they should end up.
- To take the text "type" in: In the effects panel, search for "typewriter." Drag information technology onto your text layer and press the "U" key on the keyboard to meet the default animation keyframes. Move them so that the animation lasts from one second to ii seconds.
- To accept the text fade in: Set 2 keyframes for opacity: one for 0% at one second, and ane for 100% at two seconds.
Above is an example of the animation I created. Both of the boxes swing in from the left and the text types itself using the typewriter issue. I fabricated the animation 3 seconds instead of 2. - Optional: animate the elements off-screen.
If y'all would similar, you tin have the lower third leave the screen in the same manner in which information technology arrived. Just copy the same keyframes in a reverse order at the finish of the clip.Don't experience like doing that much more piece of work? Don't worry. In most cases, a lower third just ends abruptly when the prune ends—no need to animate off. Oft, clips of b-roll or interview get by so quickly in a video that it would be distracting to focus as well much on having things flight in and out of the screen.
- Adjust timing.
Once yous have your keyframes in the timeline, highlight all of them and right click. Go to keyframe assistant > piece of cake ease. This will make the motion smoother.Sentinel the animation a couple times in the preview window. Does it move too tiresome? Too fast? Practice the elements come on in the right social club? Motility the playhead with your mouse to lookout man information technology slower if y'all need to really examine the animations yous've created.

Once yous're happy with the finished product, you take your first lower 3rd! Re-create this ane and utilize it as a template for the other text you'll need in a video.
Source: https://futureisyours.adobe.com/en/blog/how-to-make-animated-lower-thirds.html
Posted by: wyantposeed.blogspot.com
0 Response to "How To Animate Over A Video Adobe Animate"
Post a Comment